

Why booting devices over the network?
You may have installed an operating system on your computer. For this, we need a portable data carrier (usually a pendrive nowadays), which will be adequately prepared (be bootable). For this, we must properly load the operating system onto the carrier and, after the whole process, approach the machine and push the carrier there.
It sounds interesting, and it’s probably the 1st, 2nd or 3rd time. Unfortunately, when we enter a production environment, or for some reason, we need to install operating systems on computers more often, this process can become quite monotonous and take a lot of time. It would be even worse if the computers had no data carrier reader or it was difficult to access. In such a situation, PXE technology can come to the rescue.
What is iPXE?
An open-source framework that includes a PXE implementation and makes its implementation easier.
What needs to be configured to work?
The first important element for everything to work is that the client device supports PXE boot technology. This should be fine as most computers support thus technology, but it’s worth making sure this is indeed the case. To do this, the easiest way is to enter the BIOS and find the PXE technology in the network or advanced options, which should be enabled, and then change the boot priority to network.
All the required tasks on the client side are completed with this. More things need to be configured on the other side(s). A properly configured DHCP [3], TFTP [4] servers, and the NBP file are three important things.
Client: PXE boot enabled
The client device must support PXE boot — enable it in the BIOS network or advanced options and change the boot priority to network.
DHCP server
Assigns an IP address to the client and indicates the TFTP server's IP address and the NBP file name.
TFTP server
Stores and sends the appropriate configuration and installation files — the NBP and the operating-system files.
NBP file
Network Bootstrap Program — loads the appropriate operating-system installation files stored on the TFTP server.
How does PXE (based on iPXE) work?
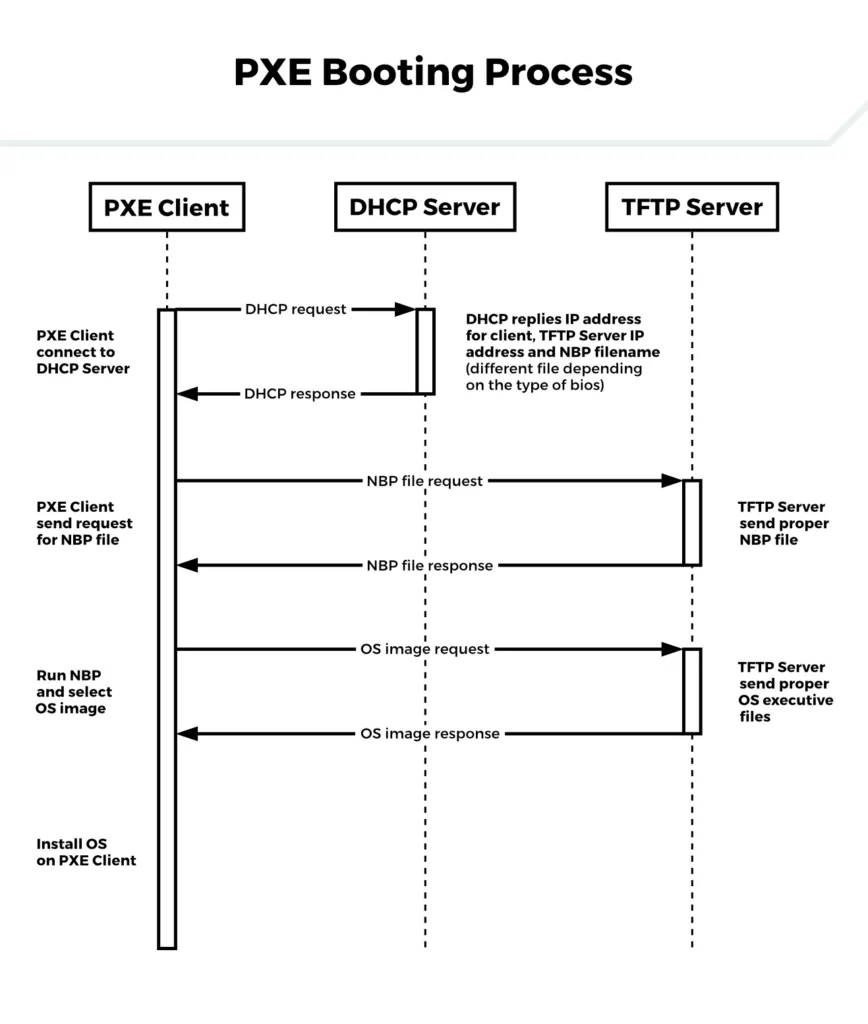
- First, connect your device to a network with a properly configured DHCP server.
- The DHCP server will provide the client with the appropriate IP address and indicate the IP to the TFTP server and the name of the NBP file.
- The client sends a request to obtain the NBP file to the TFTP server.
- The TFTP server sends the appropriate NBP file.
- The client sends a request for appropriate files to boot the operating system.
- The TFTP server sends the appropriate files.
- The client starts installing the operating system.
Additional automation of installation and configuration
Automating the installation of the operating system using PXE sounds great, and it can sound even better if we use additional automation elements. By properly configuring the PXE bootloader, we can choose from many operating systems to install with different variants and other files.
Additionally, e.g., in the case of Debian installation, you can attach an appropriate preseed file to the installer, where selected options that we would typically have to enter during installation, can be preconfigured (from partition settings, configure users, language selection, to even running post-installation scripts). Thanks to this, this process can be brought to such a state that we would not have to use the keyboard during the installation stage (only before it changes the boot order).
After installing the system, you can automatically complete its configuration, e.g., using Ansible.
Examples of PXE benefits
When installing the operating system on multiple computers, PXE makes work more manageable. It can, for example, be used to upload the operating system to various computers acting as nodes in a Kubernetes cluster. Just connect the computers to the network with PXE, change the boot order to network, and everything installs “itself”.
Another example would be installing an operating system on computers with a custom configuration. Each computer requires slightly different settings. Thanks to PXE and combining it with autoinstallation files and configuring additional automation, we can install the operating system with custom-selected files and configurations, selecting a specific item from the list during installation. We can choose the default installation system accepted after some time, and then we do not need additional interaction.
Summarizing the benefits that PXE gives us:
- Saves time and cost. Fewer manual installs mean less labour — and therefore lower cost.
- No extra media. No additional media needed for installation (CDs, USB drives).
- Spot misconfigurations. It is easier to find misconfigured equipment.
- Better release documentation. Installs are better documented across releases.
- Easier machine configuration. It is better to develop the configuration on a PXE server than to upload it to a single USB drive.
- Centralized installs. Everything is installed from one place, so management is much easier.
- Scales easily. Easy to implement one system or many systems at the same time, with appropriate configuration.
- Plugs into automation. Easy connection with additional automation such as Ansible and Jenkins.